Sunday, October 31, 2010

Seats are IN!


I was really dreading installing the seats because of what I thought were some wide gaps between the seats (especially the aft seat) and the hull sides.   I spent a lot of time trimming the seat supports and seat slots to try to minimize the gaps.


However, after weeks of agonizing over the issue, I found that mixing the fillet epoxy so it was really really thick was the answer.  This helped to hold it in place in the wider gaps until it hardened.  I got this trick off one of the online boat building forums, which are proving to be invaluable for the project.  In this case, many cooks enhance the broth.

 Next the boat was flipped over to make the fillets on the underside of the seats.  With almost all the basic components in place the boat is now approaching its full weight and feels very stiff.  Even though I didn't get as far in this project as I had hoped this year the impression of substance gives me a great feeling of satisfaction.


Shop lights keep things warm while the epoxy fillets cure.  It's getting down to the freezing mark at night now.  After about 24 hours of curing with the lights  we had an 18 hour power outage due to the  upper midwest "landicane".   I think (hope) that the curing had progressed enough that the cool off didn't cause any major problems.

It's not even making it to 50 degrees F. during the day.  My boat building season is drawing to a close.

So this is where things will end for the year, unless I order the sail kit and assemble some of it in the warmth of our Minneapolis townhome.  Next up for the hull in the spring will be sanding the exterior.

The Daggerboard Trunk


Finally!  With the help of friend and neighbor Dave the daggerboard trunk was installed.


.
Fitting some parts require more than one set of hands and the trunk is one of them.


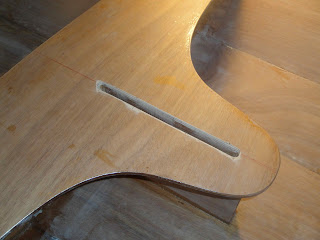
After the center seat was glued and filleted into place, I cut the hole for access to the trunk.  This was a second good excuse for buying my router.  The saw rasp trimmed the slot up along with my Dremmel.

A slot also needed to be cut in the bottom of the hull for the daggerboard using the same equipment.  

 You get one shot only so this was a little bit of a gut check to cut a hole in the hull I labored on for so long.

But all went well.  Skeg and daggerboard slot line up just like they're supposed to.

Tuesday, September 14, 2010

The Daggerboard Trunk

For a pretty straightforward item, assembling and finishing this part seemed to take forever.  The main issue was not realizing that there is supposed to be a very slight curve to the bottom of the trunk to conform to the bottom of the interior hull.  I didn't realize this right away and had to back up a step in the assembly, which took a couple of extra days.  I had epoxyed the wrong side of one of the planks and had to coat the other side before gluing it together.


Night time temperatures are now down in the 40's and 30's again which really slows up the cure times.  Epoxy that would cure and be ready for sanding overnight a couple of weeks ago now has to sit for 48 hours due to the low temps, even with the help of my incandescent shop light.

Anyway its now done and ready for sanding and installing under the center seat.  All three seats are also sanded and ready for installation.

Lots of Sanding and a Little Wildlife Diversion

The dog days of summer have given way to the dog days of epoxy sanding.  In order for the varnish or paint to properly stick to epoxy and look smooth the entire interior and exterior of the hull, frames and seats must be sanded to a dull gray finish.  Before the seats go in is the best time to do this to the interior and that's what I spent the better part of the week doing and it's not finished yet.  Starting with 80 grit then 120 then 220 the object is to flatten the surface, eliminating all small circular shiny spots that indicate small depressions.  


This is all easier said than done.  As you sand a film of white epoxy dust builds up and it's tough to see how much progress is being made.  You have to remove the dust with a shop vac after each effort.


It also involves lots of bending at the waist to reach the bottom of the boat.  Every once in a while you accidentally go through the epoxy to the wood.  That area then has to be recoated, cured and re-sanded.


The random orbital sander works great for the open areas but I had trouble getting into the interior stems, the upright frames and where the planks come together.  For a while I thought I was condemned to hand sanding for these areas.


Thankfully I discovered the Black and Decker Mouse which weighs a fraction of the ROS and has a narrow enough sanding pad to get into most of the tight spaces.

                              
I'll probably have to go over everything with 220 grit the next session, but I feel pretty close to being done with the interior.


Meanwhile, back in Nature:  Cheryl took this shot one morning of our local eagle dismembering a fish on our dock.  You'll notice he isn't fazed by the scary plastic owl on the upright.

Monday, August 23, 2010

Starting on the inside

I now had to flip over the boat.  This action is turning out to be somewhat problematic since I can't do it myself.  Because there are seldom any people around who could help me (or any people period) I have to time the "flipping" when my wife is around.  The boat is getting a little heavier with each step, so I hope she can continue to help me with this.
This is the part where the grunt work really begins, I think.  I couldn't reach the middle of the interior of the boat because the saw horses I have are too tall, so I had to cobble together a couple of supports that were no more than 18 inches or so high.  I sanded the entire interior, then vacuumed the dust out.  Fillets were applied to the joint between the bottom and number one panel.  While the fillets were still wet I dropped in four pieces of fiber glass cloth, one in each of the four compartments separated by the seat supports.  Straight epoxy is then applied to the cloth until it's pretty transparent.  After it stiffens somewhat I trimmed off the excess cloth.  This was a much more difficult job than fiber glassing the outside of the hull. In spite of thinking that I ensured the cloth was perfectly flat I had some bubbles under the cloth the next morning.  I was able to push these flat because, luckily, the epoxy was still wet. I don't think they'll be too noticeable when everything is done.  I filled in any remaining stitch holes that were open, then another layer of epoxy to the entire interior, wait, sand, vacuum, epoxy.  I'll have to sand everything one more time in preparation for the varnishing before installation of the seats, but won't get it done this trip.
Another view after the third coat.
I test fit the seats and they went in place reasonably well, except for the stern seat.  I'll have to deal with that next trip.  I beveled the edges of the seats after the test fit and sanded everything smooth, especially the edges that will be visible.
Two coats of epoxy need to be applied to both sides of all seats.

The Skeg

The skeg is the "fin" in the bottom of the stern that helps the boat track properly.  Installing it is a fairly straightforward procedure:

I've marked the skeg position and also where the four screws go.  They are drilled from the top, then I went underneath to drill counter sunk holes.
After making sure the skeg is plumb to the bottom, the surface of the contact points of the skeg and bottom are coated with epoxy thickened with silica, the skeg is applied in the measured position and then the wood screws are sunk from the inside of the boat into the skeg.
The "tail" was a little warped so I forced it into a centered position with duct tape.
A fillet of wood powder thickened epoxy is applied to the angle formed by the skeg and bottom.
There was quite a bit of rasping and sanding to get the "tail" to blend into the stern stem, but it turned out pretty well.  Another strip of wood is tacked and epoxied to the bottom edge of the skeg (called a wormscrew) which will absorb most of the abuse and can be replaced if too worn, leaving the skeg unharmed.  After some more sanding, etc. three coats of epoxy are applied. 

Finishing the rails

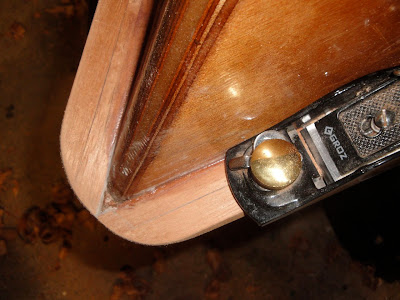
When I resumed work the first task was to finish the rails.  Unfortunately I didn't take many pictures of this process.  After practicing on scrap with my new router and 3/8" roundover bit, I more or less successfully added a rounded edge to the top of the rails.  I used my sander to remove a few gouges, etc. Next (as seen in the photo) I planed the excess off the bottom of the outside rail to match where the inner rail was trimmed before installation.   I wanted to stain the rails a dark walnut shade, so I proceeded to do that, applied a first coat of epoxy after letting the stain dry overnight, and then let the epoxy dry.  You're supposed to sand in between the two to three epoxy coats.  When I did that the stain started to come off in patches and looked terrible.  I might have used the wrong type of stain.  Anyway that meant re-sanding the entire rails AND the breasthooks which created another problem:  the breasthook wood is not solid but laminated with different types of wood.  After sanding the hooks for the second time I broke through the first lamination and I decided to sand the entire surface of the hooks to the same depth.  This doesn't look as nice as I had hoped, but it's not terrible.Then two coats of epoxy was re-applied to the rails and hooks . . . a very frustrating experience, but I'm moving on.

Wednesday, July 28, 2010

Applying the Rails


I managed to get both rails on this week and it wasn't as tough as I thought. The glueing together of the rail pieces that I did last week worked well with no separation issues when I inspected them. One of the rails was slightly out of alignment where the last short piece was glued to the second longer section, but that turned out to be a non-problem when I went to glue it to the hull.

Most of the first day was spent planing the taper of the bow ends of the two inner rails as advised by the instructions and then cleaning up excess epoxy by planing, sanding, etc. I'm a pretty slow planer but I'm getting better. Each inner rail was then dry fitted to the edge of the sheer by means of clamps and then two countersunk holes were drilled into the breast hooks on each side through both rails. The wood used for the rails is extremely hard and I was forced to discover the higher speed setting on my cordless drill. One rail is removed, both contact surfaces are covered with epoxy, the rail is then wrestled into position and the two wood screws are driven through the rail into the bow breast hook side. Then it's simply a matter of applying the rail progressively toward the stern, attaching clamps as you go. When you get to the stern breast hook two more holes are drilled and screws driven home. Then you do the other side. I managed to use every c-clamp, spring and spanner clamp I had, 39 in all! CLC says that 15 is the minimum and 30 is better but 45 would be even better, with most of them being c-clamps.

I can't imagine attempting to do this with just 15 clamps. You're not so much bending the rail to the sheer as pulling the sheer out to meet the rail, and for this reason the much more powerful c-clamps are more useful.

The instruction book says to rasp both stems down to a one inch flat surface, but I just noticed that the photos in the book show the top of the stems are left pointed, which is news to me. In the shot at the left you can see a gap is created between the rails and the prow because I flattened the stem some in this area as well. I'm going to have to modify both points when it comes to planing down the rails to a "pleasing shape" as CLC says, and I have a plan for this.

After letting the inner rails cure for 24 hours minimum the 8 wood screws are removed from the bow and stern. Mercifully, the rails didn't pop off the boat when I did this. I'm getting more and more confident of the holding power of the epoxy. The second, outer set of rails is attached in the same manner as the inner ones. Here the spring clamps are almost useless because you're pulling not only the sheer but also the inner rails out to meet the outer rail. A 48 hour cure time is needed now at 70 degrees. No problem because I have to be back in Minneapolis until sometime next week.

Next week: rounding the top outer edge of the rails and shaping the points. I'm thinking of buying or borrowing a router to save on sanding time.

Monday, July 19, 2010

A productive week


The picture at left shows my shop set up which consists of our garage, four sawhorses and an old picnic table, which I can convert into a twelve foot long workbench with the addition of two pieces of particle board when needed. Due to my permanent workbench and wall storage in the rear of the garage, my assembled boat hull just fits with a couple of feet of work space at the bow and stern. I'm using almost the entire available floor area for the project. I've read that some people have assembled Skerrys and kayak kits in basements and apartments. I'm sure this can be done, but I'm glad I have this venue and could even use a little more space than I have.

I started out the week with final sanding of the hull. I had previously filled in the all the stitch holes with wood fiber thickened epoxy, which leaves brown marks around each hole. Since I'd already decided to paint the hull I wasn't too concerned with eliminating all remnants of these marks by a thorough sanding. I was also a little gun shy after sanding through the veneer around the puzzle joints in a couple of places. It's not real clear in the instruction book whether brown marks as opposed to blobs of thickened epoxy would disappear after applying the subsequent coats of clear epoxy, so I was curious what would happen. Well, they don't disappear. That's a lesson I'll remember when finishing the interior which I plan to leave "bright" or natural, with just a coat of varnish over the clear epoxy.

After sanding I cleaned the hull by first vacuuming and then wiping down with denatured alcohol. The bottom panel and adjacent garboards were to be covered with fiberglass cloth, a process that I dreaded a little due to an unfortunate past experience. All went well, though, and I was able to smooth and stretch the cloth with clear epoxy applied with a vinyl squeegee and it conformed perfectly to the bottom. This slow curing epoxy is really easy to work with in these situations, giving you plenty of time to fix little imperfections.

Two more coats of clear epoxy over the entire hull, applied with a roller and then tipped out with a foam brush, separated by at least five or six hours of curing time and I was done. It turned out pretty nice.


Next was the installation of the breast hooks. There was some rasping and sanding involved to make sure the pieces conformed to the shape of the sheers, fore and aft. The Shinto saw rasp is really coming in handy for these types of tasks. The hooks were then glued and screwed into place.


Since I would have to return to Minneapolis for a few days I decided to get some of the time consuming gluing out of the way. The first was the rails which are four in number and come in three pieces each, with the scarfs mercifully pre-cut. As these will be under a lot of stress when fastened to the sheer the manual recommends letting the epoxy cure for a minimum of 48 hours. I'm starting to use the mass quantities of spring clamps and C-clamps I've purchased.


I skipped ahead in the manual and found that I needed to glue together two identical skeg (goes on the bottom of the hull) pieces at some point, so I decided to do that now. I could now leave my north woods workshop secure in the knowledge that for a time at least my project was taking care of itself.

When I return I've some planing of the assembled rail pieces to do. Then I'll start to install the gunnel rails (inwales and outwales in boat jargon), another adventure for sure.

Thursday, July 1, 2010

Manual labor

This session I was able deal with the gaps between the forward support and the hull and the other somewhat more worrisome gaps in the stern stem. Both of these were solved with wood dust thickened epoxy. First I tacked all the supports to the hull, let the epoxy cure and then was able to remove the copper support stitches. I then filled the gaps and the stitch drill holes.

I laid a 3/4" fillet of thickened epoxy on the inside of both stems, covered the fillet with 3" wide fiber glass cloth and allowed it to cure for 48 hours (because we still don't have 24 hours of continuous 74 degrees even though it's almost July). Waiting for the cure is the most frustrating aspect of this project, so far.
After curing I could remove the last of the copper stitches (a milestone) from the stems and, hallelujah, they didn't spring apart on me! Next I rasped and planed until I had a one inch flat spot the entire length of both stems, about 3 hours worth. This was my introduction to the more physical aspects of boat building.
Cleaning up the hull is next. I found that cabinet scrapers, which I've never used before, are great for removing unwanted epoxy without the noise and vibration of a random orbital sander, but you have to re-install the bur on the edge of the scraper about every 5 minutes. I think this tool will really come in handy for smoothing out the several coats of epoxy on the hull.

For rounding chines and general smoothing, though, the sander is indispensable. I also used my rabbet plane for cleaning up the laps between the planks.


Another issue that has been bugging me was the fact that two of the planks arrived from the factory with broken half puzzle joints. I was assured by the CLC help line that since I planned on painting the hull I could, again, solve this issue with thickened epoxy. And they were right, I did. Cured epoxy can be formed to a shape and then rasped or planed just like wood.
After the equivalent of 14 hours over three days, covered from head to foot in sawdust and with more than a few muscles sore, I'm generally satisfied that the hull is ready for fiber glassing, which will happen in the next session.


Wednesday, June 16, 2010

Gluing, stitching and more gluing

Because you can't ship 15 foot long pieces of lumber very economically the bottom and side planks, among other components, are composed of two pieces that have to be glued together.
Above can be seen the "puzzle joints of the nos. 1, 2 and 3 side planks after gluing. The shape of the joint makes it a lot easier to join the pieces with the proper alignment.

The stitching process involves drilling a 1/16th in. hole every 4 inches or so along both edges of the bottom and planks and the 3 supports. A 3.5 to 5 inch copper wire is pushed through the holes and hand tightened. Later all the wires are completely tightened with a pliers so all the pieces fit together as tightly as possible. As will be seen that doesn't always work out perfectly, so other methods are used.

Here I've stitched together the bottom and nos. 1 and 2 side planks and have added the upright supports.


All three side panels plus the bottom and supports are now stitched together and tightened as closely as I could. I had to move the stern support forward a small amount for a much better 3-dimensional fit. Some gaps can be seen between the front support and the port side and at the bow stem, but I'm told I can fix this with thickened epoxy later.


Here I'm tacking the bottom panel to the no. 1 plank and using a different mixture in a syringe to tack together between the side planks, avoiding getting epoxy on the wires. The big issue about working with epoxy is the cure time. This particular type needs 24 hours to cure at 75 degrees. For every 10 degrees less you need another 24 hours and you can't work under 55 degrees. In northern Wisconsin 75 degrees is hard to come by most of the year, so you have to compensate by providing a heat source or just waiting longer between steps.


All the tacking is now complete, the epoxy has properly cured and I can begin removing most of the copper wires.


Now I fill in the gaps between the epoxy tacks on the bottom and side tacks and let it cure again.